After you have finished this lesson, you:
- Understand how JUnit 5 tags work.
- Can add JUnit 5 tags to your test methods.
- Know how you can make your tests easier to write and maintain by using custom annotations.
Let’s begin.
Tagging Test Methods With JUnit 5
JUnit 5 tags allow you to divide your test methods into different groups and configure the groups whose tests are run when you run your tests. When you want to add a tag to a test class or a test method, you have to annotate your test class or test method with the @Tag annotation and configure the name of your tag by setting the value of the @Tag annotation’s value attribute.
When you configure the name of your tag, you must use a non-null value that isn’t blank. Also, when JUnit 5 validates the name of your tag, it removes the leading and trailing whitespace characters from it and ensures that the remaining name doesn’t:
- Contain whitespace characters.
- Contain ISO controller characters.
- Contain any reserved characters.
Additional Reading:
When you annotate a test class with the @Tag annotation, Junit 5 has to decide which test methods get the given tag. JUnit 5 finds these test methods by following these steps:
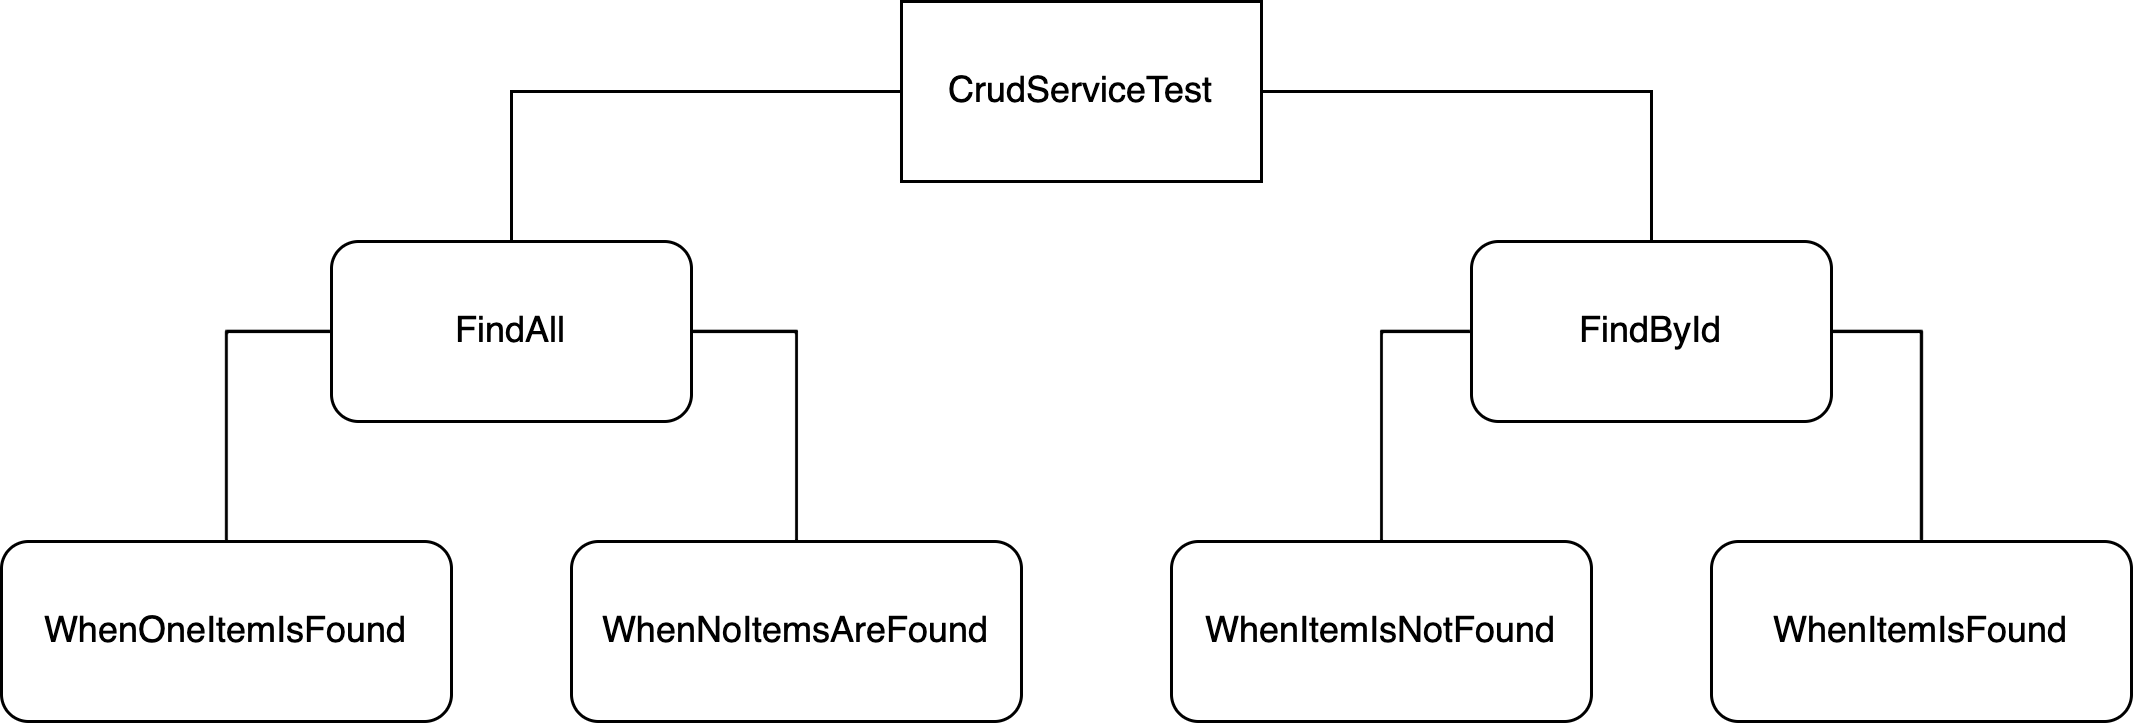
First, JUnit 5 transforms the class hierarchy of your test class into a tree. The annotated test class is the root node of the created tree and the nested test classes which are enclosed by the annotated test class are added to the created tree as nodes.
The following figures illustrate the structure of two imaginary trees:
Example 1: The @Tag Annotation Is Added to a Test Class
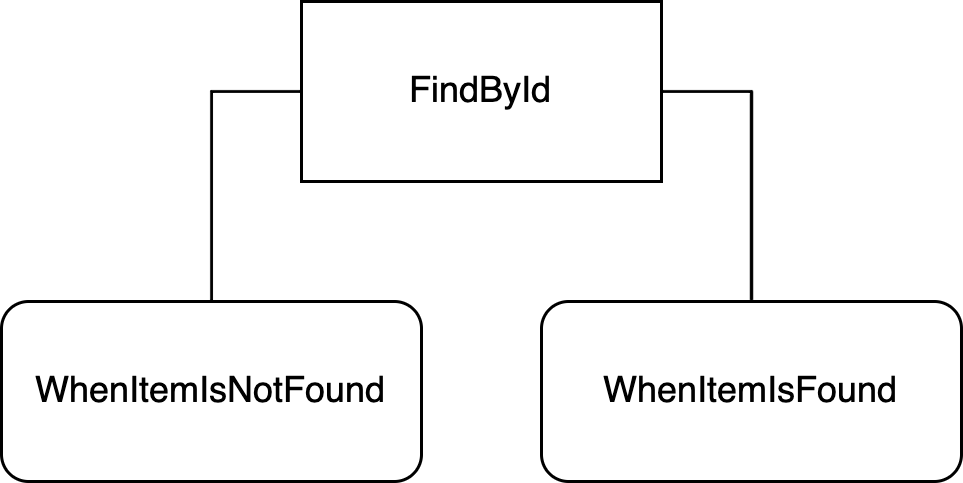
Example 2: The @Tag Annotation Is Added to a Nested Test Class
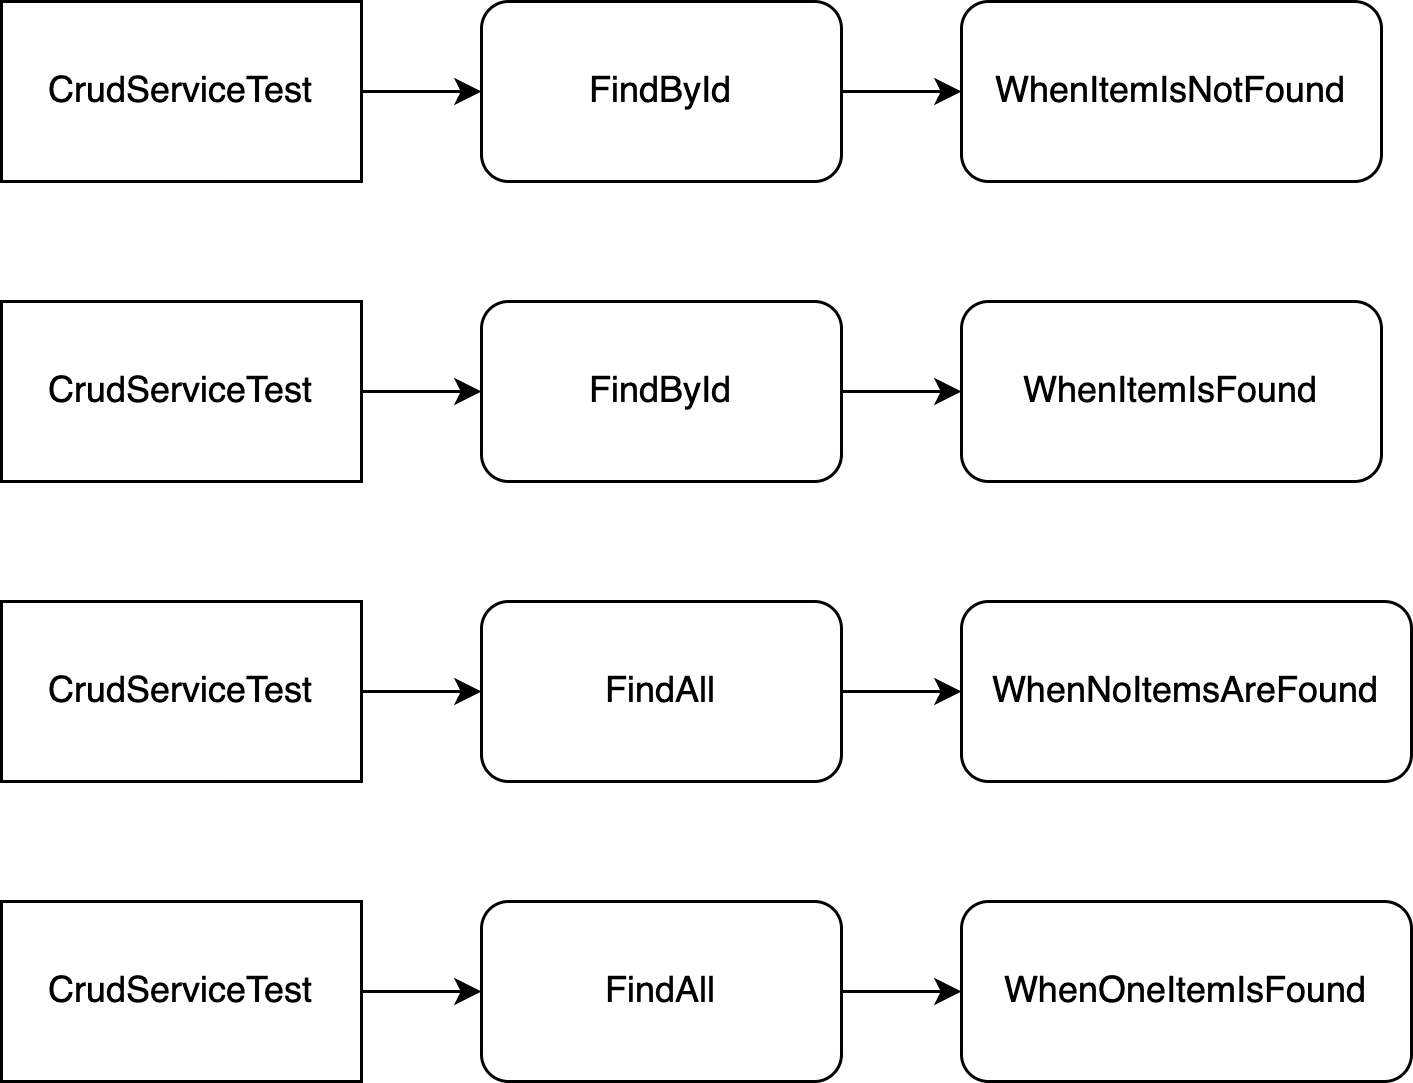
Second, JUnit 5 finds all paths from the root node (aka the annotated test class) to the leaf nodes. A leaf node is either a “normal” test class or a nested test class which don’t contain any nested test classes.
The following figure illustrates the paths found from the tree illustrated by the example 1:
Third, JUnit 5 iterates the found paths one by one and processes all test classes found from the inspected path by following these steps:
- Find the test methods of the inspected class.
- Iterate the found test methods one by one.
- If the test method doesn’t have the specified tag, add the tag to the inspected test method.
Next, we will take look at some examples which demonstrate how you can add one tag to your test methods.
Adding One Tag to Your Test Methods
When you want to add one tag to your test methods, you can use one of these three options:
First, if you want to add a tag to all test methods found from your test class, you have to annotate your test class with the @Tag annotation. For example, let’s assume that you want to add the tag ‘A’ to all test methods found from your test class.
After you have done this, the source code of your test class looks as follows:
import org.junit.jupiter.api.Tag;

@Tag("A")
class RootClassTagAExampleTest {

}
Second, if you want to add a tag to all test methods found from a nested test class, you have to annotate your nested test class with the @Tag annotation. For example, let’s assume that your test class has two nested test classes and you want that:
- The test methods found from the
WhenTestHasTagAclass have the tag ‘A’. - The test methods found from the
WhenTestHasTagBclass have the tag ‘B’.
After you have the made required changes to your test class, its source code looks as follows:
import org.junit.jupiter.api.DisplayName;
import org.junit.jupiter.api.Nested;
import org.junit.jupiter.api.Tag;

class NestedClassTagExampleTest {

    @Nested
    @DisplayName("When the test has the tag: A")
    @Tag("A")
    class WhenTestHasTagA {

    }

    @Nested
    @DisplayName("When the test has the tag: B")
    @Tag("B")
    class WhenTestHasTagB {

    }
}
Third, if you want to add a tag to one test method, you have to annotate your test method with the @Tag annotation. For example, let’s assume that your test class has two test methods and you want add different tags (‘A’ and ‘B’) to these test methods.
After you have made the required changes to your test class, its source code looks as follows:
import org.junit.jupiter.api.DisplayName;
import org.junit.jupiter.api.Tag;
import org.junit.jupiter.api.Test;

class RootClassMethodTagExampleTest {

    @Test
    @DisplayName("Should be invoked when we run tests which have the tag: A")
    @Tag("A")
    void shouldBeInvokedInvokedWhenWeRunTestsWhichHaveTagA() {

    }

    @Test
    @DisplayName("Should be invoked when we run tests which have the tag: B")
    @Tag("B")
    void shouldBeInvokedInvokedWhenWeRunTestsWhichHaveTagB() {

    }
}
Let’s move on and find out how you can add multiple tags to your test methods.
Adding Multiple Tags to Your Test Methods
If you want to add multiple tags to your test methods, you can use one of these two options:
First, because the @Tag annotation is a repeatable annotation, you can simple apply multiple @Tag annotations to your test class, nested test class, or test method. For example, let’s assume that you want to add the tags ‘A’ and ‘B’ to all test methods found from your test class.
After you have made the required changes to your test class, its source code looks as follows:
import org.junit.jupiter.api.DisplayName;
import org.junit.jupiter.api.Tag;
import org.junit.jupiter.api.Test;

@Tag("A")
@Tag("B")
class RootClassMultipleTagsExampleTest {

}
Second, you can annotate your test class, nested test class, or test method with the @Tags annotation and configure the tags by setting the value of the @Tags annotation’s value attribute. For example, let’s assume that you want to add the tags ‘A’ and ‘B’ to all test methods found from your test class.
After you have made the required changes to your test class, its source code looks as follows:
import org.junit.jupiter.api.DisplayName;
import org.junit.jupiter.api.Tag;
import org.junit.jupiter.api.Tags;
import org.junit.jupiter.api.Test;

@Tags({
        @Tag("A"),
        @Tag("B")
})
class RootClassMultipleTagsExampleTest {

}
Next, you will find out how you can make your tests easier to write and maintain when you are adding tags to your test methods.
Writing a Custom Annotation
When you add tags to your test methods, you must specify the names of your tags by using string literals. Because it’s very likely that you want to add the same tag to test methods which are found from different test classes, you must write the same name multiple times. This is a problem because:
- You have to remember the correct spelling of your tag’s name and double-check that the name of your tag doesn’t contain any typos. This makes your tests hard to write.
- If you want to change the name of your tag, you have to make that change to every test class which contains the updated tag. This makes your tests hard to maintain.
It’s clear that you should remove duplicate tag names from your test suite. You can get rid of duplicate tag names by writing a custom annotation which adds the required tag to your test methods.
@Tag annotation. However, I think that using custom annotations is a better choice because they make your test code a bit easier to read.Let’s assume that you want to write a custom annotation which adds the tag ‘unitTest’ to your test methods. You can write this annotation by following these steps:
- Create a new annotation class.
- Ensure that you can annotate both test classes and test methods with your new annotation.
- Ensure that your annotation is recorded in the class file by the compiler and retained by the VM at runtime.
- Ensure that your custom annotation is part of the public contract of the annotated element.
- Ensure that you can add the tag ‘unitTest’ to your test methods by using your new annotation.
After you have written your custom annotation, its source code looks as follows:
import org.junit.jupiter.api.Tag;

import java.lang.annotation.Documented;
import java.lang.annotation.ElementType;
import java.lang.annotation.Inherited;
import java.lang.annotation.Retention;
import java.lang.annotation.RetentionPolicy;
import java.lang.annotation.Target;

@Target({ ElementType.TYPE, ElementType.METHOD })
@Retention(RetentionPolicy.RUNTIME)
@Documented
@Tag("unitTest")
public @interface UnitTest {
}
You can now add the tag ‘unitTest’ to your test methods by annotating your test classes and test methods with the @UnitTest annotation. For example, let’s assume that you want to add the tag ‘unitTest’ to all test methods found from your test class.
After you have made the required changes to your test class, its source code looks as follows:
@UnitTest
class UnitTestAnnotationExampleTest {

}
As you can see, if you replace the @Tag annotation with a custom annotation, you will make your life easier because:
- You don’t have to remember the correct spelling of your tag’s name and you cannot make any typos when you add this tag to your test methods.
- If you want to change the name of your tag, you have to make that change to only one place.
You can now divide your test methods into groups by using JUnit 5 tags. Let’s summarize what you learned from this lesson.
Summary
This lesson has taught you six things:
- JUnit 5 tags allow you to divide your test methods into different groups and configure the groups whose tests are run when you run your tests.
- If you want to add a tag to all test methods found from your test class, you have to annotate your test class with the
@Tagannotation. - If you want to add a tag to all test methods found from a nested test class, you have to annotate your nested test class with the
@Tagannotation. - If you want to add a tag to one test method, you have to annotate your test method with the
@Tagannotation. - If you want to add multiple tags to your test methods, you can use multiple
@Tagannotations or use the@Tagsannotation. - If you want to make your tests easier to write and maintain, you must replace the
@Tagannotation with a custom annotation.
Get the sample code from Github
These steps are the same for all exercises of the Introduction to JUnit 5 Tags lesson. In other words, before you start an exercise, make sure that you have finished these steps:
1. Clone the Git repository that contains the sample applications of this course. If you have already cloned that repository, you can ignore this step.
2. Open the project found from the introduction-to-junit5/selecting-invoked-test-methods/exercises/junit5-tag-exercise directory with your favorite IDE.
Remember to revert your changes after you have finished an exercise!
This exercise helps you to understand how you can add one JUnit 5 tag to all test methods found from a test class. You can finish this exercise by following these steps:
1. Open the JUnit5TagExerciseTest class that’s found from the com.cleantestautomation.junit5intro package.
2. Ensure that all test methods found from the JUnit5TagExerciseTest class have the tag: ‘unitTest’.
3. Run your tests with Maven or Gradle. Make sure that all three test methods are run.
This exercise helps you to understand how you can add one JUnit 5 tag to all test methods found from a nested test class. You can finish this exercise by following these steps:
1. Open the JUnit5TagExerciseTest class that’s found from the com.cleantestautomation.junit5intro package.
2. Ensure that all test methods found from the NestedTestClassOne class have the tag: ‘unitTest’.
3. Run your tests with Maven or Gradle. Make sure that only the test method, that’s found from the NestedTestClassOne class, is run.
This exercise helps you to understand how you can add one JUnit 5 tag to one test method. You can finish this exercise by following these steps:
1. Open the JUnit5TagExerciseTest class that’s found from the com.cleantestautomation.junit5intro package.
2. Ensure that the testMethodFoundFromRootClass() method, that’s found from the JUnit5TagExerciseTest class, has the tag: ‘unitTest’.
3. Run your tests with Maven or Gradle. Make sure that only the testMethodFoundFromRootClass() method is run.
This exercise helps you to understand how you can add multiple JUnit 5 tags to all test methods found from a test class. You can finish this exercise by following these steps:
1. Open the JUnit5TagExerciseTest class that’s found from the com.cleantestautomation.junit5intro package.
2. Ensure that all test methods found from the JUnit5TagExerciseTest class have the tags: ‘unitTest’ and ‘fast’.
3. Run your tests with Maven or Gradle. Make sure that all three test methods are run.
This exercise helps you to understand how you can add multiple Unit 5 tags to all test methods found from a nested test class. You can finish this exercise by following these steps:
1. Open the JUnit5TagExerciseTest class that’s found from the com.cleantestautomation.junit5intro package.
2. Ensure that all test methods found from the NestedTestClassOne class have the tags: ‘unitTest’ and ‘fast’.
3. Run your tests with Maven or Gradle. Make sure that only the test method, that’s found from the NestedTestClassOne class, is run.
This exercise helps you to understand how you can add multiple JUnit 5 tags to one test method. You can finish this exercise by following these steps:
1. Open the JUnit5TagExerciseTest class that’s found from the com.cleantestautomation.junit5intro package.
2. Ensure that the testMethodFoundFromRootClass() method, that’s found from the JUnit5TagExerciseTest class, has the tags: ‘unitTest’ and ‘fast’.
3. Run your tests with Maven or Gradle. Make sure that only the testMethodFoundFromRootClass() method is run.
This exercise helps you to understand how you can write a custom annotation which allows you to add JUnit 5 tags to test classes, nested test classes, and test methods. You can finish this exercise by following these steps:
1. Write a custom annotation which allows you to add the JUnit 5 tag: ‘unitTest’ to test classes, nested test classes, and test methods.
2. Open the JUnit5TagExerciseTest class that’s found from the com.cleantestautomation.junit5intro package.
3. Ensure that all test methods found from the JUnit5TagExerciseTest class have the tag: ‘unitTest’. Use your new custom annotation.
4. Run your tests with Maven or Gradle. Make sure that all three test methods are run.